实现目的
VIM是一个强大而古老的编辑器,这里我们利用VIM来打造适合自己的Python开发环境,可能会涉及VIM其它的配置。
环境准备
1、CentOS Linux release 7.2.1511 (Core)
2、VIM - Vi IMproved 8.0
3、Python 2.7.5(自带)
实施配置
1、升级VIM,由于CentOS系统自带的VIM版本是7.4,我们这里把它升级至8.0,避免版本太低出现其它问题。
  [root@biezz ~]# yum remove vim -y
  [root@biezz ~]# yum install ncurses-devel -y
  [root@biezz ~]# git clone https://github.com/vim/vim.git
  [root@biezz ~]# cd vim/src
  [root@biezz ~]# make && make install  # 这里有可能会出现缺少gcc而不能安装,如若出现,请yum安装gcc
  [root@biezz ~]# vi /etc/profile
  添加如下:
  export PATH=$PATH:/usr/local/bin/vim
  source /etc/profile
此时可能会出现一个问题,vim不支持Python如下:
 [root@biezz ~]# vim --version |grep python
+comments          +libcall           -python            +vreplace
+conceal           +linebreak         -python3           +wildignore
如果是已经编译安装过了,我们需要重新编译一次,我之前就是编译安装完了才发现不支持Python,解决方法如下:
 [root@biezz ~]# cd /usr/local/src/vim-master
[root@biezz vim-master]# make distclean
[root@biezz vim-master]# yum install -y python-devel python3-devel
[root@biezz vim-master]# yum install automake gcc gcc-c++ kernel-devel cmake  #后面安装YouCompleteMe时需要用到
[root@biezz vim-master]# ./configure --with-features=huge --enable-pythoninterp --enable-python3interp --enable-luainterp --enable-multibyte --enable-sniff --enable-fontset
[root@biezz vim-master]# make && make install
[root@biezz vim-master]# vim --version |grep python
+comments          +libcall           +python            +vreplace
+conceal           +linebreak         -python3           +wildignore
链接方式: gcc   -L/usr/local/lib -Wl,--as-needed -o vim        -lm -ltinfo -lnsl   -ldl    -L/usr/lib64/python2.7/config -lpython2.7 -lpthread -ldl -lutil -lm -Xlinker -export-dynamic
2、安装Vundle扩展管理器
[root@biezz ~]# git clone https://github.com/gmarik/Vundle.vim.git ~/.vim/bundle/Vundle.vim
[root@biezz ~]# touch ~/.vimrc   # VIM 配置文件
我们在 VIM 的配置文件中添加如下内容:
set nocompatible              " required
filetype off                  " required

" set the runtime path to include Vundle and initialize
set rtp+=~/.vim/bundle/Vundle.vim
call vundle#begin()

" alternatively, pass a path where Vundle should install plugins
"call vundle#begin('~/some/path/here')

" let Vundle manage Vundle, required
Plugin 'gmarik/Vundle.vim'

" Add all your plugins here (note older versions of Vundle used Bundle instead of Plugin)

" All of your Plugins must be added before the following line
call vundle#end()            " required
filetype plugin indent on    " required
VIM 编辑器执行:PluginInstall
命令行执行:vim +PluginInstall +qall
**这里我们穿插一下关于VIM中粘贴代码,格式混乱的问题
VIM 中由于自动缩进,导致粘贴复制过来代码的时候,会有格式上的混乱,我们来执行 :set paste 来解决这个问题,当然你也可以加到vim的配置文件中
3、安装YouCompleteMe自动补全插件,我们从最难的开始,这个插件的安装很容易出各种各样的错,相信多次尝试你会解决的。
在.vimrc文件中添加: Bundle 'Valloric/YouCompleteMe' ,然后执行:PluginInstall
然后开始手动编译:
[root@biezz vim-master]# cd ~/.vim/bundle/YouCompleteMe/
[root@biezz YouCompleteMe]# ./install.py --clang-completer   #编译支持C语言家族的语法特性
[root@biezz YouCompleteMe]# ./install.py --all               #编译支持所有语言的语法特性
如果安装时遇到这个问题:gmake[3]: 警告:检测到时钟错误。您的创建可能是不完整的。 请更新时间
[root@biezz YouCompleteMe]# ntpdate cn.pool.ntp.org

let g:ycm_autoclose_preview_window_after_completion=1    #操作完成后,自动补全窗口不会消失
map <leader>g  :YcmCompleter GoToDefinitionElseDeclaration<CR>    #定义了“转到定义”的快捷方式

自定义:
"youcompleteme  默认tab  s-tab 和自动补全冲突
""let g:ycm_key_list_select_completion=['<c-n>']
let g:ycm_key_list_select_completion = ['<Down>']
"let g:ycm_key_list_previous_completion=['<c-p>']
let g:ycm_key_list_previous_completion = ['<Up>']
"关闭加载.ycm_extra_conf.py提示
let g:ycm_confirm_extra_conf=0
" 开启 YCM 基于标签引擎
let g:ycm_collect_identifiers_from_tags_files=1
" 从第2个键入字符就开始罗列匹配项
let g:ycm_min_num_of_chars_for_completion=2
" 禁止缓存匹配项,每次都重新生成匹配项
let g:ycm_cache_omnifunc=0
" 语法关键字补全
let g:ycm_seed_identifiers_with_syntax=1
"force recomile with syntastic
nnoremap <F5> :YcmForceCompileAndDiagnostics<CR>
"nnoremap <leader>lo :lopen<CR> "open locationlist
"nnoremap <leader>lc :lclose<CR>    "close locationlist
inoremap <leader><leader> <C-x><C-o>
"在注释输入中也能补全
let g:ycm_complete_in_comments = 1
"在字符串输入中也能补全
let g:ycm_complete_in_strings = 1
"注释和字符串中的文字也会被收入补全
let g:ycm_collect_identifiers_from_comments_and_strings = 0
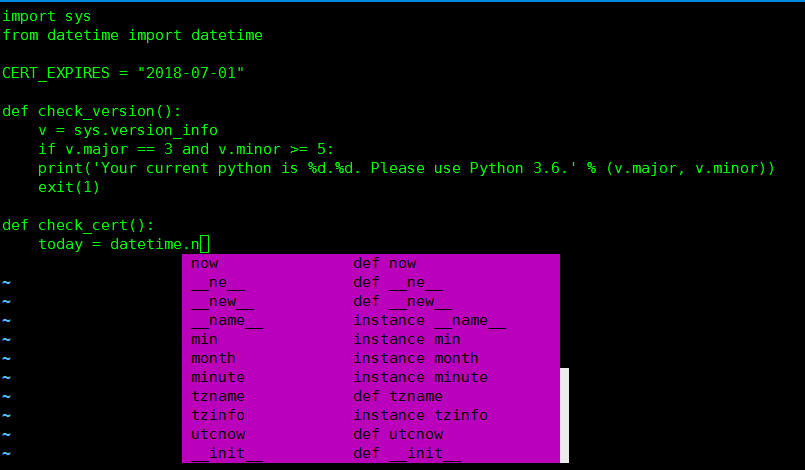
安装完成后,会有如下效果:
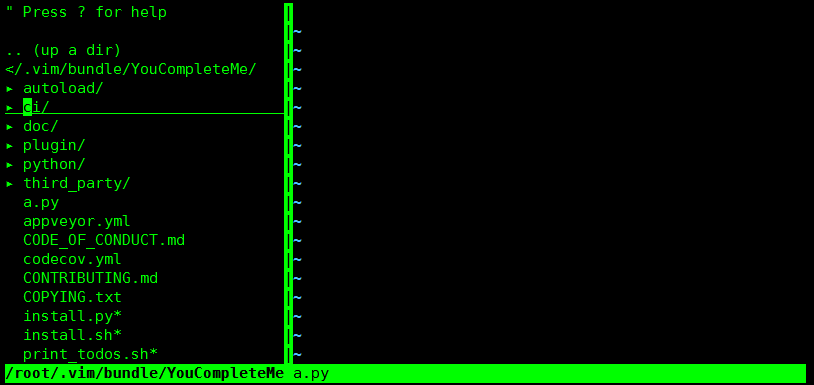
4、目录树插件nerdtree:
"设置按F2启动NerdTree
map <F2> :NERDTreeToggle<CR>
"隐藏目录树中的.pyc文件
let NERDTreeIgnore=['\.pyc$', '\~$'] "ignore files in NERDTree
效果如下:
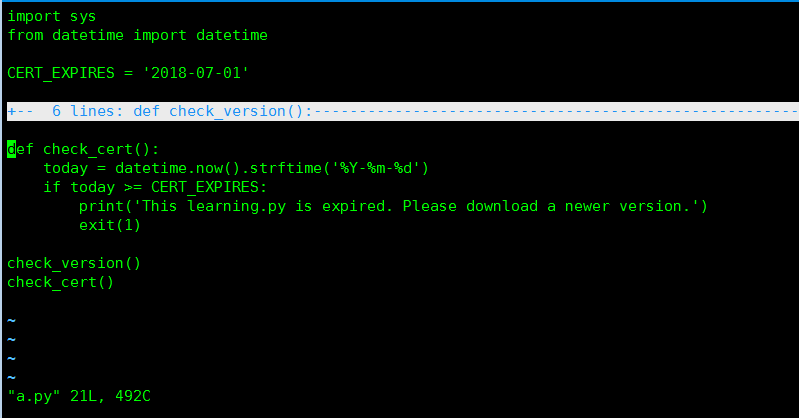
5、代码折叠
set foldmethod=indent
set foldlevel=99
nnoremap <space> za
Plugin 'tmhedberg/SimpylFold'
效果如下:
6、自动缩进
Plugin 'vim-scripts/indentpython.vim'
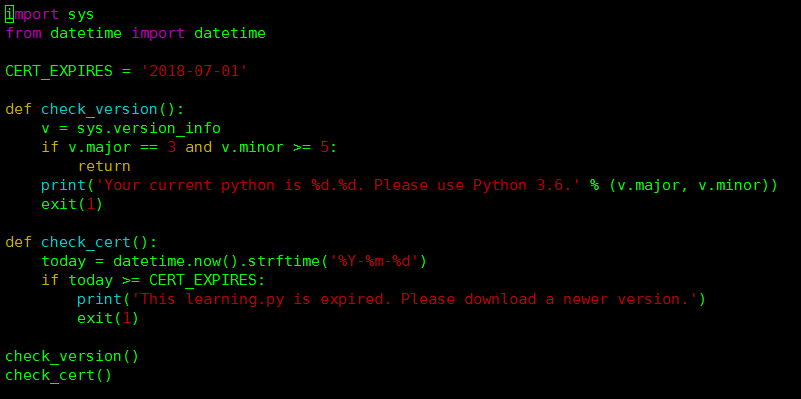
7、语法检查/高亮
Plugin 'scrooloose/syntastic'
Plugin 'nvie/vim-flake8'
let python_highlight_all=1
syntax on
效果如下:
8、配色方案
我觉得自带配色方案:darkblue 就挺好有,在vimrc中添加 :colorscheme darkblue
[root@biezz colors]# cd /usr/local/share/vim/vim80/colors      #这个目录下展示都有哪些配色方案可以选
[root@biezz colors]# ls
blue.vim      desert.vim    koehler.vim  peachpuff.vim  slate.vim
darkblue.vim  elflord.vim   morning.vim  README.txt     torte.vim
default.vim   evening.vim   murphy.vim   ron.vim        zellner.vim
delek.vim     industry.vim  pablo.vim    shine.vim
9、其它的一些配置
支持UTF-8编码:set encoding=utf-8
横向打开一个文件::sv <filename> #可以配合tab键使用
纵向打开一个文件::vs <filename>
指定在屏幕上面的布局:
set splitbelow
set splitright
配合快捷键使用:
nnoremap <C-J> <C-W><C-J>
nnoremap <C-K> <C-W><C-K>
nnoremap <C-L> <C-W><C-L>
nnoremap <C-H> <C-W><C-H>
这些是简单的基本配置,可以参考:vim-config